How to Replace a Water Heater Thermocouple or Flame Sensor
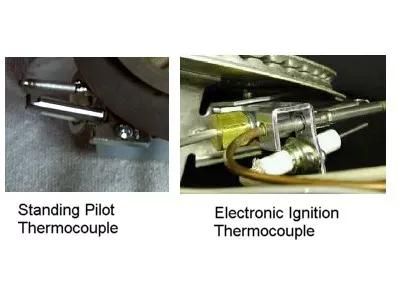
A thermocouple or flame sensor is a device used to control gas flow in gas water heaters. On older-style heaters with standing pilot lights, the device is typically called a thermocouple, while on newer units with electronic ignition, the same (or virtually the same) device is called a flame sensor. For our purposes, we'll refer to both devices as the thermocouple.
The thermocouple is part of the pilot burner assembly and connects to the gas control valve on the outside of the water heater. It is a simple device that converts the heat from a burning flame into a small electrical current, allowing it to work like a switch to control the flow of gas from the gas supply valve. In simple terms, when the thermocouple does not sense flame, it prevents the gas valve from delivering gas to the burner. It is, therefore, a key safety element of your water heater system. Often a bad thermocouple is the reason why a water heater pilot does not ignite or the burner does not stay lit.
Thermocouple or Flame Sensor?
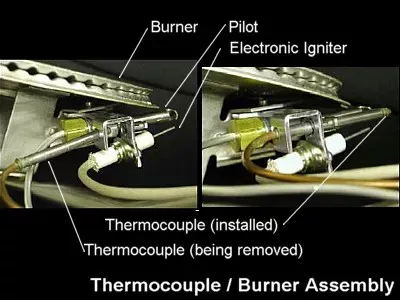
The type of ignition system you have in your water heater will determine how you replace the thermocouple. With both types of ignition—standing pilot or electronic—the thermocouple is part of the burner assembly. With a standing pilot, there is just a pilot and thermocouple attached to the burner assembly. With an electronic ignition, there is both the pilot and thermocouple, as well as an electronic igniter attached to the burner assembly.
What You'll Need
Equipment / Tools
- Adjustable wrench or open-end wrench
- Screwdrivers
- Utility knife (if needed)
Materials
- 1 Water-heater manifold replacement gasket (if needed)
- 1 New thermocouple (if needed)
Instructions
How to Disconnect the Gas Control Valve
Disconnecting the connections to the gas control valve is the first step when servicing either an electronic-ignition or a standing-pilot water heater:
Turn the gas control valve on the water heater to the OFF position. Close the shutoff valve on the gas supply piping to the water heater.
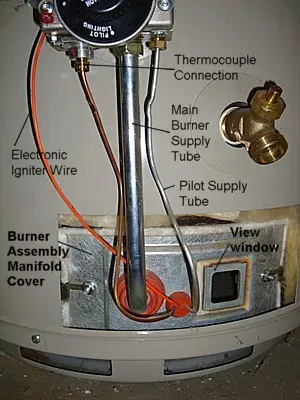
Remove the cover panel exposing the burner assembly (standing pilot) or burner manifold cover plate (electronic ignition). Use an adjustable wrench or open-end wrench to loosen and remove the thermocouple connection, the main burner supply tube, and the pilot supply tube from the control valve. For electronic ignition heaters, remove the wire to the Piezo igniter.
How to Replace the Thermocouple on an Electronic Ignition Water Heater
1) Remove Burner Assembly Manifold Cover
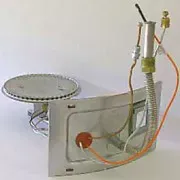
The combustion chamber of water heaters with electronic ignition is sealed tight and gasketed. To access the combustion chamber, you must remove the burner assembly manifold cover, which protects chamber with the burner supply tube, burner, electronic ignition, pilot, and thermocouple.
First, remove the fasteners securing the burner assembly manifold cover plate. Depending on the brand and model of water heater you have, the panel may be secured by nuts, screws, or specialty tamper-resistant fasteners such as #20 Torx-head screws.
2) Remove the Burner Assembly
Grab the burner supply tube and push down slightly to free the manifold, pilot tube, and thermocouple connections.
Gently remove the manifold/ burner assembly from the burner combustion compartment. Take care not to damage the internal components. If the burner does not move easily, check around the base—there may be additional screws holding it down.
3) Remove the Cover Plate Gasket
Carefully remove the old gasket from around the manifold cover plate if it is in good condition and you would like to reuse it. Otherwise, remove the gasket and plan to buy a replacement.
Clean the metal surfaces between the cover plate and the water heater.
4) Remove the Thermocouple
Slowly and firmly pull and twist the old thermocouple from its mounting bracket. It should come out easily if you use firm pressure. Make sure you do not bend or deform the connection between the pilot and the thermocouple bracket.
Remove the old thermocouple completely by pulling it through the rubber grommet seal from inside to outside, or through the opening in the burner assembly manifold cover. You can cut the old thermocouple to remove it, if needed.
5) Install a New Thermocouple
Take the old thermocouple to the hardware, home improvement, or plumbing supply store to buy an exact replacement. Also buy a new gasket for the manifold cover plate, if you are replacing the old one.
Insert the new thermocouple from the outside through the grommet or opening in the burner assembly manifold cover. Insert the thermocouple into its mounting bracket until it is fully seated or clicks into place.
Position the thermocouple tip so that the pilot flame will envelop the top 3/8 to 1/2 inch of the thermocouple tip.
6) Reinstall the Burner Unit
Install a new burner manifold cover gasket, or reinstall the old one if it is in good condition.Place the burner in the combustion chamber and properly seat the unit.
Reinstall the cover assembly. Do not over-tighten the screws or fasteners. Finally, reconnect the gas control valve (see below).
How to Replace the Thermocouple on a Standing-Pilot Water Heater
1) Remove Burner Assembly
Once the pilot supply tube, burner supply tube, and thermocouple are disconnected from the gas control valve (see above), simply lift and remove the burner assembly from the bottom of the water heater.
2) Remove the Thermocouple
Slowly and firmly pull and twist the old thermocouple from the thermocouple bracket. It should come out easily if you use firm pressure. Be careful not to deform any of the parts.
3) Install a New Thermocouple
Take the old thermocouple to the hardware, home improvement, or plumbing supply store to buy an exact replacement.
Insert the new thermocouple into the bracket from which you removed it until it is fully seated or clicks into place. Position the thermocouple tip so that the pilot flame will envelop the top 3/8 to 1/2 inch of the thermocouple tip.
4) Reinstall the Burner Unit
Reinsert the burner in the combustion chamber and properly seat the unit. Reconnect the gas control valve (see below).
How to Reconnect the Gas Control Valve
For both electronic-ignition and standing-pilot water heaters: Once the new thermocouple is installed, reconnect the pilot, burner, and thermocouple (and electronic igniter for an electronic-ignition unit) to the gas control valve.
1) Reattach the Gas Tubes
Reconnect the burner supply tube, pilot supply tube, and thermocouple to the gas control valve. The mounting nut on the thermocouple should be no more than 1/4 turn beyond hand-tight. On electronic-ignition units, also reconnect the Piezo igniter.
2) Turn On the Gas
Open the shutoff valve on the gas supply piping. Turn the gas control valve to the ON position. For standing-pilot units, relight the pilot, following the manufacturer's instructions, before setting the valve to ON. Set the water heater thermostat to the desired temperature.
3) Test the Water Heater
Check the main supply tube and pilot supply tube at the gas control valve for gas leaks, using a soap-and-water solution. Coat the fittings with the soapy water, and look for bubbles that indicate a leak. If a leak is found, tighten all gas connections and retest them with the soapy water until no leaks are detected.
Source: https://www.thespruce.com/replacing-water-heater-thermocouple-flame-sensor-1824918



Share On: